本文基于北京大学软件与微电子学院曹健老师的Tensorflow笔记整理 ——b站视频教程
环境配置
环境:Tensorflow 2.60版本 ; Python3.8版本
参考CSDN博客 :anaconda+tensorflow2.6.0详细一步一步安装
创建虚拟环境
conda create -n tf2.6.0 python==3.8.0激活虚拟环境,以便安装库等:
conda activate tf2.6.0正式安装
conda install tensorflow-gpu=2.6.0如果觉得下载慢,就可以添加清华镜像源(不建议。下载速度快就尽量搞镜像源,后期会有问题)
conda config --add channels https://mirrors.tuna.tsinghua.edu.cn/anaconda/pkgs/free/
conda config --add channels https://mirrors.tuna.tsinghua.edu.cn/anaconda/pkgs/main/
conda config --set show_channel_urls yes
附加:Ancaonda常用命令总结
- 查看以创建的虚拟环境: conda info --envs / conda env list
- 激活创建的环境:conda activate xxx(虚拟环境名称)
- 退出激活的环境:conda deactivate
- 删除一个已有虚拟环境:conda remove --name(已创建虚拟环境名称) tensorflow --all
- 创建一个新的虚拟环境:conda create --name tensorflow python=3.7.3
- 查看安装的包:conda list/pip list
- 可以通过克隆的方式更改创建虚拟环境的名称:conda create --name 新名字 --clone 已创 建虚拟环境名称
- 安装包:pip install scipy -i https://pypi.douban.com/simple 或者 conda install scipy -i https://pypi.douban.com/simple
- 卸载包:pip uninstall xxxx;conda uninstall xxxx
- 检查conda版本:conda --version
- 安装tensorflow的脚本:pip install tensorflow-cpu2.3.0 -i https://pypi.douban.com/simple/
- 更新升级工具包:conda upgrade --all
- 升级pip:python -m pip install --upgrade pip
- 使用镜像源网站安装需要的库:pip install -i https://pypi.tuna.tsinghua.edu.cn/simple/ tensorflow2.0.0 安装其他库则只需将后面的库替换掉即可
- 常用镜像网站:
阿里云 http://mirrors.aliyun.com/pypi/simple/
中国科技大学 https://pypi.mirrors.ustc.edu.cn/simple/
清华大学 https://pypi.tuna.tsinghua.edu.cn/simple/
中国科学技术大学 http://pypi.mirrors.ustc.edu.cn/simple/
豆瓣(douban) http://pypi.douban.com/simple/
张量与常见函数
张量简介
TensorFlow 中的 Tensor 表示张量,是多维数组、多维列表,用阶表示张量的维数。
0 阶张量叫做标量,表示的是一个单独的数,如 123;
1 阶张量叫作向量,表示的是一个一维数组如[1,2,3];
2 阶张量叫作矩阵,表示的是一个二维数组,它可以有 i 行 j 列个元素,每个元素用它的行号和列号共同索引到,如在[[1,2,3],[4,5,6],[7,8,9]]中,2 的索引即为第 0 行第 1 列。
张量的阶数与方括号的数量相同,0 个方括号即为 0 阶张量,1 个方括号即为 1 阶张量。故张量可以表示0 阶到 n 阶的数组。也可通过 reshape 的方式得到更高维度数组。
创建张量
创建张量有若干种不同的方法:
(1) 利用 tf.constant(张量内容,dtype=数据类型(可选)),第一个参数表示张量内容,二个参数表示张量的数据类型。
举例如下:
import tensorflow as tf a=tf.constant([1,5],dtype=tf.int64)
print(a)
print(a.dtype)
print(a.shape)
输出结果为:<tf.Tensor([1,5], shape=(2 , ) , dtype=int64)> <dtype: 'int64'> (2,)
(2) 我们很多时候数据是由 numpy 格式给出的,此时可以通过如下函数将 numpy 格式化为 Tensor 格式:tf. convert_to_tensor(数据名,dtype=数据类型(可选))。
举例如下:
import tensorflow as tf
import numpy as np
a = np.arange(0, 5)
b = tf.convert_to_tensor( a, dtype=tf.int64 )
print(a)
print(b)
输出结果为:[0 1 2 3 4] tf.Tensor([0 1 2 3 4], shape=( 5 , ), dtype=int64)
可见,将 numpy 格式的 a 转换成了 Tensor 格式的 b。
(3) 可采用不同函数创建不同值的张量。如用 tf. zeros(维度)创建全为 0 的张量,tf.ones(维度)创建全为 1 的张量,tf. fill(维度,指定值)创建全为指定值的张量。其中维度参数部分,如一维则直接写个数,二维用[行,列]表示,多维用[n,m,j..]表示。
举例如下:
a = tf.zeros([2, 3])
b = tf.ones(4)
c = tf.fill([2, 2], 9)
print(a)
print(b)
print(c)
输出结果:tf.Tensor([[0. 0. 0.] [0. 0. 0.]], shape=(2, 3), dtype=float32)
tf.Tensor([1. 1. 1. 1.], shape=(4, ), dtype=float32)
tf.Tensor([[9 9] [9 9]], shape=(2, 2), dtype=int32)
(4) 可采用不同函数创建符合不同分布的张量。
如用 tf. random.normal (维度,mean=均值,stddev=标准差)生成正态分布的随机数,默认均值为 0,标准差为 1。
用 tf. random.truncated_normal (维度,mean=均值,stddev=标准差)生成截断式正态分布的随机数,能使生成的这些随机数更集中一些,保证了生成值在均值附近;
利用 tf.random. uniform(维度,minval=最小值,maxval=最大值),生成指定维度的均匀分布随机数,用 minval 给定随机数的最小值,用 maxval 给定随机数的最大值,最小、最大值是前闭后开区间。
举例如下:
d = tf.random.normal ([2, 2], mean=0.5, stddev=1)
print(d)
e = tf.random.truncated_normal ([2, 2], mean=0.5, stddev=1)
print(e)
f = tf.random.uniform([2, 2], minval=0, maxval=1)
print(f)
输出结果:tf.Tensor([[0.7925745 0.643315 ] [1.4752257 0.2533372]], shape=(2, 2), dtype=float32)
tf.Tensor([[ 1.3688478 1.0125661 ] [ 0.17475659 -0.02224463]], shape=(2, 2), dtype=float32)
tf.Tensor([[0.28219545 0.15581512] [0.77972126 0.47817433]], shape=(2, 2), dtype=float32)
常用函数
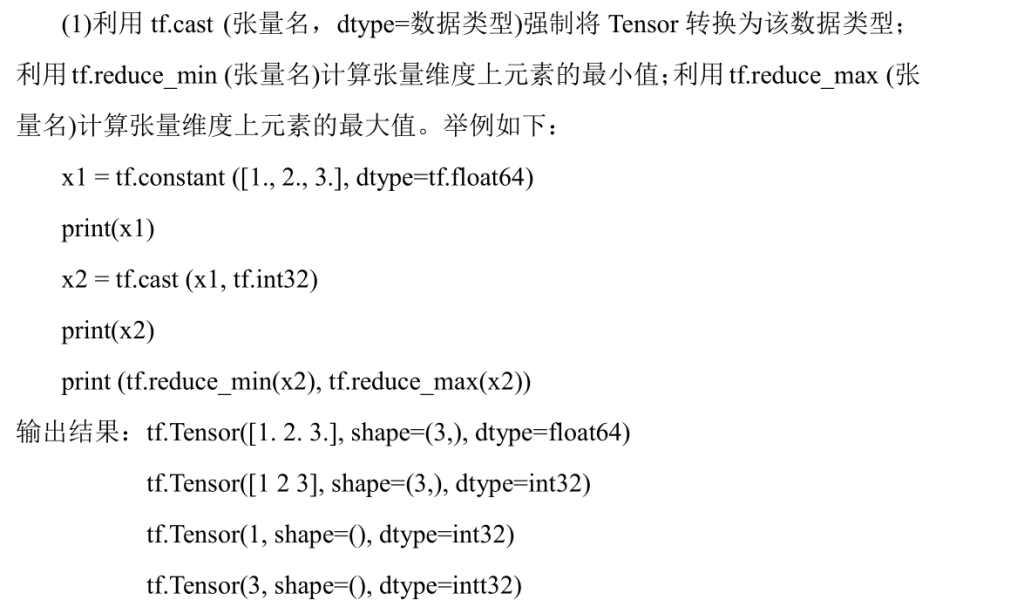
cast(类型转换);reduce_min(最小值);reduce_max(最大值)

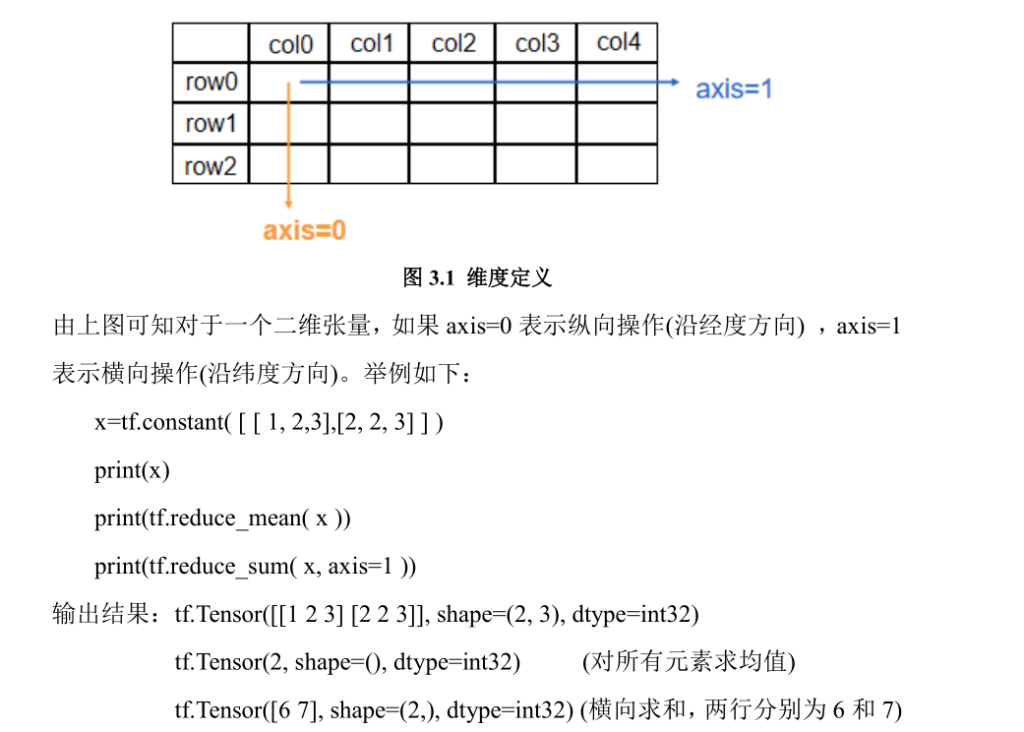
reduce_mean(平均值);reduce_sum(求和)


Variable(标记可训练)

四则运算


幂次运算

matmul(矩阵相乘)


data.Dataset.from_tensor_slices(构建数据集)


GradientTape(计算梯度)


enumerate(枚举元素)

one_hot(独热码表示标签)


nn.softmax(前向传播输出符合概率分布)


assign_sub(参数实现自更新)

argmax(返回张量沿指定维度最大值索引)


Comments NOTHING